Manual
🎵 MidiEditor Manual
Your complete guide to creating and editing MIDI files
🚀 Getting Started
🎼 MIDI Fundamentals
📋 Menu Reference
🔧 Advanced Features
💡 Tip: Click on any section above to jump to that part of the manual!
📖 Introduction
Introduction

MidiEditor is a free software providing an interface to edit, record, and play Midi data. The editor is able to open existing Midi files and modify their content. New files can be created and the user can enter his own composition by either recording Midi data from a connected Midi device (e.g., a digital piano or a keyboard) or by manually creating new notes and other Midi events. The recorded data can be easily quantified and edited afterwards using MidiEditor.
This manual will provide an overview over the many different features of MidiEditor. However, as it would go beyond the scope of this manual to discuss the foundations of Midi, only a quick overview will be provided here.
Updated MidiEditor with additional fixes & improvements from various forks merged into one branch ahead of upstream. Meowchestra/MidiEditor@github.
Content
- Midi - a Short Overview
- The Editor and its Components
- Setting up MidiEditor
- Editing Midi files
- Playback
- Recording Midi Data
Note
MidiEditor was developed by Markus Schwenk. It is entirely written in C++ (Qt) and is available for the platforms Linux and Windows. Should MidiEditor be a software which is helpful for you and which you use often, please let the developer and other users know by providing feedback. Moreover, the developer worked on MidiEditor in his (rare) sparetime and offers it for free. So, when you feel like it, pay him a coffee (or two). Please also feel free to contact the developer in case you have any ideas which could help to improve the editor or in the case you found any bugs you want the developer to fix.
🎼 MIDI Overview
Midi - a Short Overview
Midi (Musical Instrument Digital Interface) is a digital interface allowing the user to control virtual music instruments on his computer or on other hardware components. In general, the Midi protocol is used to exchange commands like "play note X with velocity Y on instrument Z" or similar.
Those commands are usually stored and exchanged using so-called Midi events. They can contain information about the notes which are currently played, the sounds which belong to each (virtual) instrument, or general information about the song, e.g. about the key, the meter, or the song's name. While the above mentioned commands are definitely the most often used, there are many other commands, which can e.g. control the sustain pedal of a piano or define an instrument's overall volume. The events are presented below in more detail.
Tracks and Channels
The different virtual instruments are organized in tracks, where each track refers to one instrument or a group of instruments. Hence, each Midi event is assigned to a track. Each note will be assigned to the track of the instrument which plays the note, while events, which do not belong to a specific instrument (key, meter, etc.), are usually assigned to a specific track ("Tempo Track"). Moreover, each note and other instrument-specific events are assigned to a channel. There are 16 channels where each channel has a defined sound (e.g. "Piano" or "String Ensemble"). While it may sound redundant to have each note assigned to a track and a channel, the concept makes sense. This is, because the information about the different tracks is only known to the device requesting another device to play the note. The other device will only receive information about the channel on which to play the note, which reduces the traffic needed to exchange the information. Hence, the tracks are (mostly) for a user's orientation when editing a file. Usually, all notes within a single track are also assigned to one specific channel. However, there are exceptions, e.g. when a group of strings is divided into two parts where one part plays pizzicato and the other part plays legato; in this case both groups can be noted in the same track but they have to use different channels, as each group has another sound.
Midi Events
The following list shows the different Midi events and provides an overview of their functionality.
- Note On/Off Events
Each note is represented by two events, where one event indicates the start of a note and the other event is used to stop the note. The note height is represented by a number from 0 (C0) to 127 (G10) and the note's velocity (loudness) has a range from 0 to 127. The note is assigned to a channel, where the channel's configuration specifies the voice of the note.
- Tempo Change Events
A Tempo Change Events sets the current tempo. The tempo is set in beats per minute (BPM). Higher values indicate a faster tempo.
- Time Signature Events
Any meter change is represented by a Time Signature Event in Midi. The event holds two parameters, the numerator and the denominator of the meter. E.g., in order to represent an alla breve meter, the numerator would be set to 2 and the denominator would be set to half notes.
- Key Signature Events
A Key Signature Event defines the song's key (C major, G minor, ...).
- Program Change Events
In order to define the voice (or instrument) assigned to each channel, a Program Change Event can be used. E.g., after the program Church Organ has been set for channel 5, all notes played on channel 5 will be played with an organ's voice.
- Control Change Events
Besides the voice assigned to each channel, a lot of other properties regarding a channel's sound can be controlled using Control Change Events. Up to 128 different controls exist for each channel where a value between 0 and 127 can be assigned to each control. The available controls include the sustain pedal of a piano, the channel's overall volume, and the modulation wheel.
- Key/Channel Pressure Events
These events control the pressure for each note (Key Pressure Events) or for all notes played on a given channel (Channel Pressure Events).
- Pitch Bend Events
The Pitch Bend Events are used to modify the pitch of a given channel.
- Text Events
Lyrics, instrument/tracknames or general information (Copyright etc.) can be stored in TextEvents.
- System Exclusive Events
System Exclusive Events are used by manufacturers to provide a way to send device-specific messages.
Midi I/O
While synthesizers can easily be installed and run on a computer, a lot of hardware exists which can be used to play or record Midi data (e.g. digital pianos or hardware synthesizers). Such additional hardware is usually connected to the computer using a USB port. Whether or not a synthesizer or a keyboard is running on a computer or an additional hardware which is connected to a computer does not affect the way how the device is used within a Midi software (e.g. MidiEditor). In both cases, a Midi port will be existing for each device to allow the software to receive data from or to send data to the device.
🖥️ The Editor and its Components
The Editor and its Components
The following screenshot shows the editor in use:
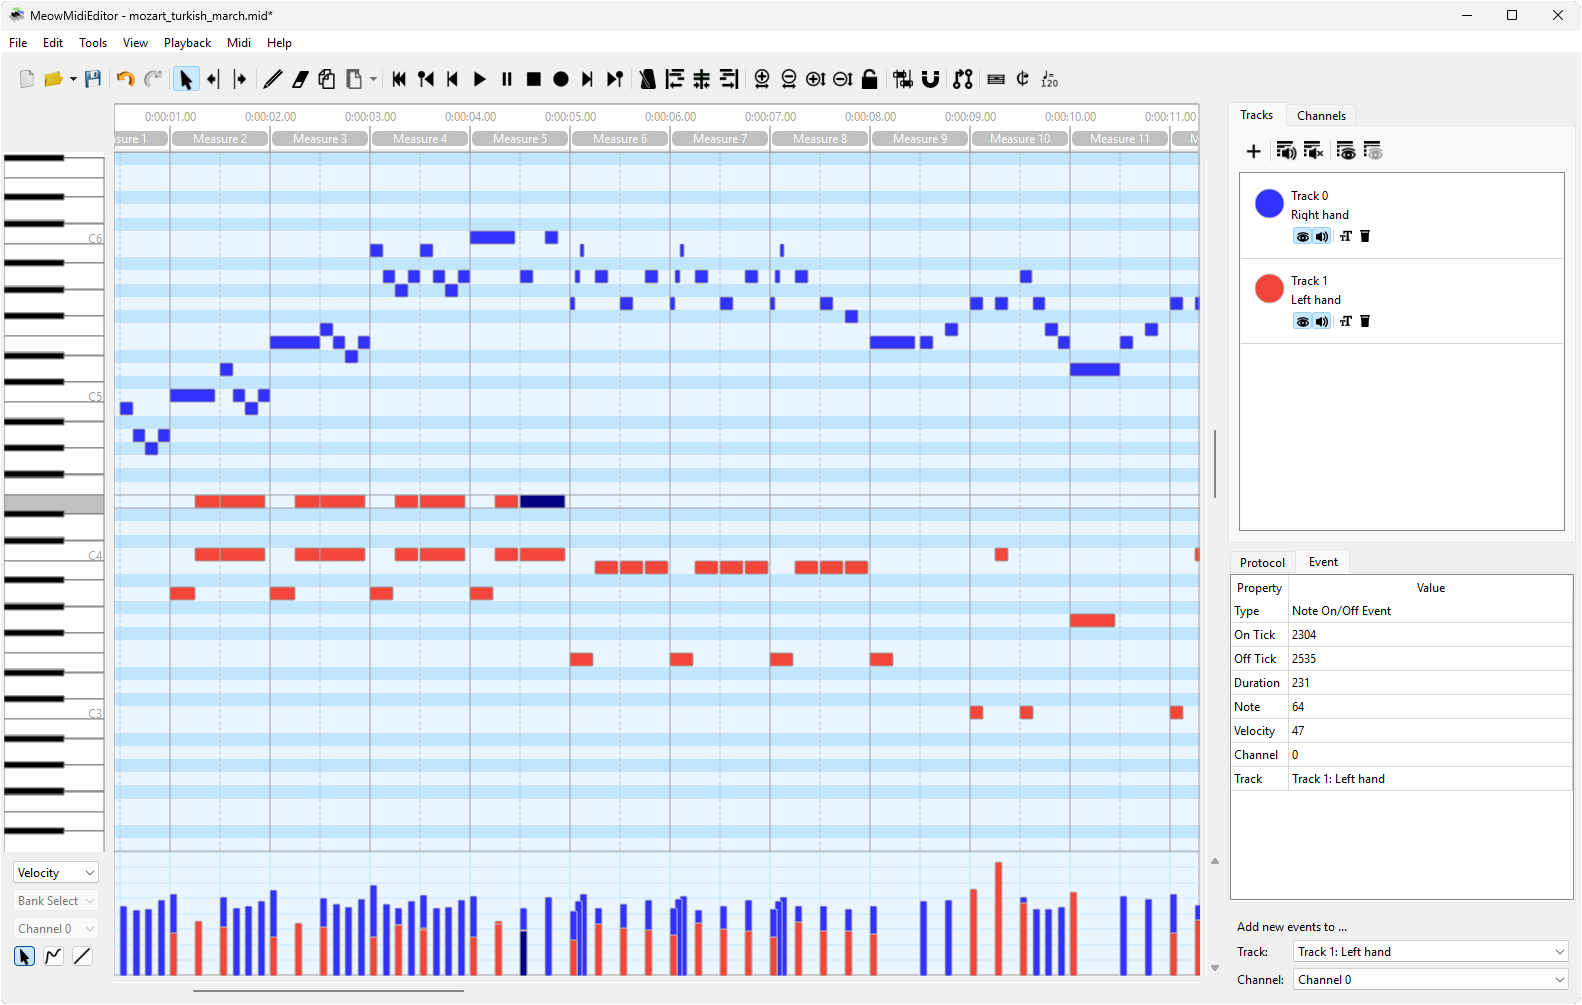
On the top of the editor there are the menubar and the toolbar which contain buttons to load and save files, to play the currently loaded file, or to edit the file's content. Moreover, the settings can be accessed from the menubar and additional tools, such as the metronome, can be controlled from the menues.
Below the toolbar, the mainscreen is split into two parts. On the left side, there is the event view, which shows all events, and a view which can be used to visualize and edit the velocity for each note as well as the different controller values, the pitch for each channel, or the key/channel pressure.
On the right side, there are different windows allowing the user to edit the tracks and channels, to visualize the protocol of all actions the user did, and to edit all properties of the selected event(s).
Menubar
Most actions which can be performed by the user are accessible using the menubar. The actions are structured within the following submenues:
| File | The file menu provides the usual actions to load, create, and save files. |
| Edit | The edit menu provides actions to select events, to copy and paste events, and to undo / redo actions. |
| Tools | The tools menu provides actions to edit the current file's content. |
| View | The view menu provides actions to customize the view settings. This includes items to zoom in or out and the raster settings. |
| Playback | The playback menu contains all actions which control the playback, the recording, or the metronome. |
| Midi | The Midi menu provides actions which let the user set the Midi preferences. |
Toolbar
The toolbar contains items from the menubar in order to provide quick access to the most frequently used actions.
Event View
The event view is the most important part of the editor. It visualizes the events in the loaded Midi file. Moreover, most editing can be done in this window.
All events are colored, where the colors can either be chosen to represent the event's channel or its track.
Notes are diplayed as bars. The rows of the event view represent the different notes according to the piano roll on the left. The horizontal length of a notes represents the note's duration according to the time line on the top of the window.
Below the notes the other events are shown. The row names below the piano roll indicate the event type shown in each row.
In order to edit the content of a Midi file, the user has to select a tool in the menubar or in the toolbar. After that, the user can select events in the event view and move the events, change the notes' durations, create new events, and remove events.
Below the event view, the velocities of all notes, the controllers, the key/channel pressure, and the pitch of each channel can be edited and visualized. The user can select the data to show and edit on the left of the window.
Track Editor
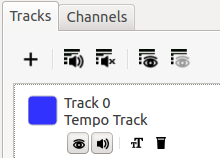
The track editor contains a list of all tracks in the currently loaded Midi file. The list shows the names of the tracks as well as their numbers and the tracks' colors. Moreover, the track editor enables the user to hide or mute specific channels (by clicking  and
and  ), to rename a track (by clicking
  ) or to delete a track (by clicking
  ).
).
New tracks can be added to the Midi file by clicking  .
.
In order to mute or hide all tracks at once, the according actions above the track list can be used.
Please refer to Tracks and Channels for more details about the track editor.
Channel Editor
Similar to the track editor, a list of all channels is provided in the channel editor. Channels can be hidden or muted (by clicking and ). Moreover, the solo mode (by clicking  ) can be activated for a specific channel which will make the channel be the only audible channel until the solo mode is deactivated.
As an instrument (or "voice") is assigned to each channel at each time, the channels' instruments can be assigned by clicking  . This will open a dialog which lets the user specify the instrument for the given channel.
Please refer to Tracks and Channels for more details about the channel editor.
Event Editor
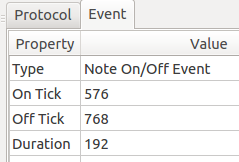
Once one or more events have been selected, the events' data will be visualized inside the event editor. The data is provided as a table containing property-value pairs. Double-clicking inside any value-field will allow the user to modify the propertie's value which will set the new value to all selected events immediately.
In the case of multiple selected events, the editor will only show the values which are equal for all selected events. Assigning new values to those initially empty values will set the value for all selected events.
⚙️ Setting up MidiEditor
Setting up MidiEditor
Midi I/O
MidiEditor has to be correctly configured in order to be able to send data to a Midi device which is connected to the computer and (if required) to receive any data in order to allow recording. If not correctly configured, MidiEditor can be used to edit Midi files; however, you won't be able to listen to the music.
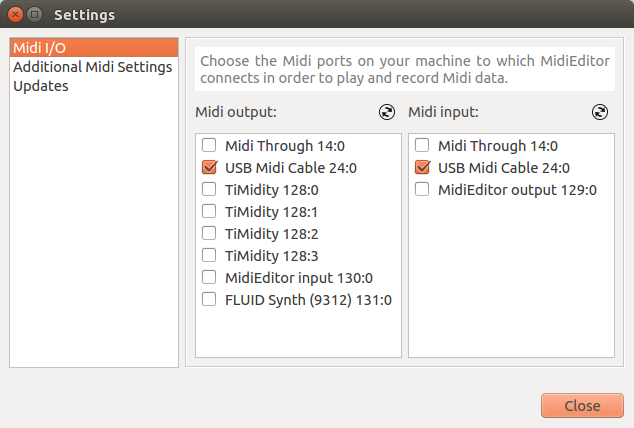
To select the input or output device click "Settings.." in the midi menu in the menubar. In the list on the left-hand side of the upcoming dialog, please select the card "Midi I/O". This will show two lists which show all available input/output devices.
Select in-/and output from the lists and click "Close".
On startup, MidiEditor will always try to connect to the devices which have been used during the last session.
Making the Input Device audible
![]()
A lot of Midi devices which allow you to input Midi data are not audible but need a connected computer to generate sounds (similar to MidiEditor). When having chosen a valid output device, you can pass all notes played at the input device to the output device which makes the played notes audible. Select the option "Connect Midi In/Out" in the midi menu in the menubar or in the toolbar.
Starting Synthesizers along with MidiEditor
There are a lot of synthesizers MidiEditor can use to produce its sound with. However, some of those synthesizers have to be started each time you start MidiEditor, as they are not running by default.
To start a software each time when MidiEditor is started, you can set a start-command which is executed at each startup of the editor. To enter this command, click the menu entry "Settings..." in the midi menu in the menubar. Select the card "Additional Midi Settings" and enter your start command in the according field. The output of the started component will be visible (after the next startup) in the text area below this field.
Automatic Updates
MidiEditor connects to internet at each startup in order to check whether a new version of MidiEditor is available. If so, you will be notified and asked to download the new version.
In order to make sure, that MidiEditor can connect to the internet configure your firewall accordingly. To disable the automatic update checker, please open the settings dialog, chose the card "Updates" and deselect the checkbox.
Support for older Midi Devices
Some old Midi devices may not support the full Midi instruction set. Hence, these devices may not stop the currently played notes when you click the stop button. MidiEditor provides a solution for this, which can be activated in the "Additional Midi Settings" card in the settings dialog. In order to activate it, check the checkbox "Manually stop notes". This should not be used when your Midi device does stop the playback whenever requested.
Larger Playback Toolbar
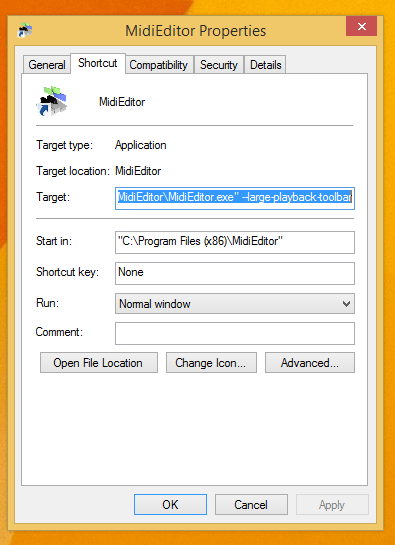
MidiEditor allows you to start with a larger playback toolbar. This is necessary when using the editor while beeing seated at your digital piano. The editor has to be started along with the command-line argument --large-playback-toolbar. On linux, use the command line to start MidiEditor. On windows, right-click on the desktop-shortcut and select "Properties". Add the argument --large-playback-toolbar to the target field as shown below.
 —
—
✏️ Editing MIDI Files
Editing Midi files
Selecting Events
In order to edit Midi events, the events which will be edited have to be selected. There are many different ways how to select events. Events can be selected using the standard tool or using one of the tools listed below.
When pressing SHIFT while selecting events, the old selection will be extended with the newly selected events. In order to remove events from a selection, the events can be accessed as if you wanted to select them while pressing CTRL.
 | Select single Events Click on an event in the view to select it. |
 | Select Events (Box) If you want to select more events at the same time you can use the "Select Box" Tool. Click at any point in the event view and drag the appearing box. All events in the box will be selected. |
 | Select all Events on the left side Select the tool and click at the wished horizontal position. All events before the clicked position will be selected. |
 | Select all Events on the left side Select the tool and click at the wished horizontal position. All events after the clicked position will be selected. |
When pressing CTRL+A, all visible events will be selected. Moreover, events from a specific track or from a specific channel can be selected using the according actions in the edit menu in the menubar.
Once an event has been selected, you can navigate the selection to nearby events using the arrow keys on the keyboard.
Moving events
Moving events will either change their start- and endtimes (horizontal movement) or the note height of note events (moving notes up and down). While the standard tool can select and move events at the same time, selected events can either be moved with one of the tools listed below, or by accessing the according values of the events in the event editor.
 | Move Events (all directions) Click inside the event view and drag the mouse in order to move all selected events. |
 | Move Events (Left and Right) Click inside the event view and drag the mouse in order to move all selected events horizontal. |
 | Move Events (Up and Down) Click inside the event view and drag the mouse in order to move all selected events vertical. This tool only works with note events. |
Moreover, the timing of the events can be corrected by quantizing them.
Changing the duration of events

Resizing note events changes the start or the end time of the event - this means the duration of the note. All other events can not be resized. The duration of a note can either be directly set using the event editor or by selecting the resizing tool (shown on the left). To use the tool, select the events to resize and move the mouse over the start or the end of a selected event. Drag the mouse in order to resize the event. The standard tool can also resize events.
Creating and deleting events

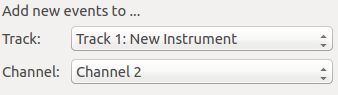
Creating events can be done with the standard tool or with the new events tool (shown on the left). Clicking inside the event view and dragging the mouse will create the events. New events will be assigned to the track and the channel which are defined in the lower right corner of the editor.
In order to remove events, you can press the DEL key which will delete all selected events. Moreover, events from a specific channel can be removed by clicking the according action in the tools menu. The remove events tool can remove specific events.
Standard Tool

This tool is the most often used tool in MidiEditor. It provides a mixture of all selectable tools above. Events can be selected by clicking on them or by dragging a box around the events to select. In order to add an event to an already existing selection, hold the SHIFT key while selecting new events in the above explained manner. In order to remove individual events, hold CTRL and click on the events to deselect. Events can be moved up and down as well as left and right by clicking inside the event and dragging the mouse. Clicking at the left or right border of an event and dragging the mouse afterwards will change the duration and the starting time of the event. All actions will be applied to all selected events. Clicking the right mouse key will create new events.
Magnet and Raster

When the magnet (shown on the left) is enabled, all dragging or shifting operations inside the event view will result in a timing which is aligned to the specified raster. That means that events will start at the correct time when the start time is close to the time which is represented by a vertical line in the event view. The raster size can be controlled from within the view menu in the menubar. It can be set to any known note length (eights, quarters etc.).
Quantization

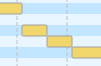
While an event can start and end at any time, it is often required to make the timing "correct" which means, that the event starts at an exact position within the measure and have a duration which is equal to a known note duration (quarter, 8th, ...). This exact timing can be achieved by quantizing the events. Pressing the quantize button (shown on the left) will align all selected events to a grid. The size of this grid, the quantization fractions, can be controlled from within the tools menu in the menubar.
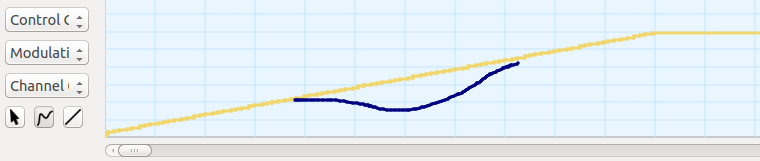
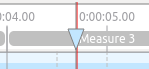
The following picture shows some notes before (left) and after (right) quantization. The quantization fractions were set to 8ths.

As tuplets are not aligned on the usual grid, you can select the events which belong to a tuplet und use the action quantize tuplet in order to correct a tuplet's timing.
Copying/Pasting Events
In order to copy events, select the events to copy and press CTRL+C. This will copy the events to the clipboard. Set the cursor at the time where you want the copied events to start and press CRTL+V which will paste the events at the wished position.
Editing Tempo and Meter
Tempo and meter can be changed using the according tools. Tempo can also be changed using the control editor below the event view.
 | Edit Tempo After selecting the tool, click inside the event view at the position were you want to change the tempo. A dialog will pop up letting you enter the new tempo. You can also select a time period by letting the mouse pressed after clicking and moving the mouse to the end of the time period. This allows you to gradually increase or decrease the tempo. |
 | Edit time signatures This tool allows you to select a measure and set the according time signature (meter). |
Add or remove measures
 | Add or remove measures Either click on the line between two measures to add measures, or select a single or multiple measures and press the DELETE key on your keyboard to remove the measures. |
Editing Controls and Velocities
Below the event view there is a window which allows you to edit and visualize the control change events, the velocity of the notes, and other parameters.
Editing can be done with three different modes:
 | Single mode The curve's points can be selected and dragged. New points can be created by clicking areas with no points. |
 | Free-hand mode A freehand curve can be entered by moving the mouse while pressing the left button. |
 | Line mode A line can be dragged with the mouse. |
Tracks and Channels
Each Midi file seperates its events in one or more tracks. Each track can contain multiple channels.
Each track has a name. This name describes the tracks content. To change it you can press the button ![]() in the track editor. A dialog will open up to enter the tracks new name.
in the track editor. A dialog will open up to enter the tracks new name.
To create a new track you can press the button ![]() in the track editor. To remove a whole track you can press
in the track editor. To remove a whole track you can press ![]() . This will delete all events of the selected track and the track itself. If there is only one track left, this track can not be deleted.
. This will delete all events of the selected track and the track itself. If there is only one track left, this track can not be deleted.
Channel 0 - 15 are the instrument channels. They contain information about the notes to play and the instruments sound. The sound of the instrument can be chosen from a list of instruments. Press ![]() in the channel list to change the instrument. This will open up the following dialog:
in the channel list to change the instrument. This will open up the following dialog:
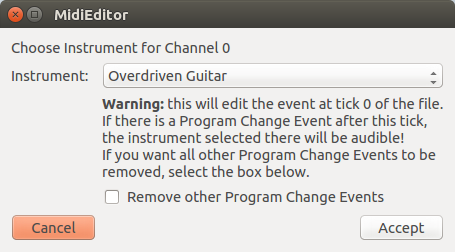
You can specify the instrument from the given list. Accepting the dialog will set the channel's instrument in the beginning of the file to the instrument from the list. Later in the file there may be Program Change Events changing the channel's instrument. To prevent this, you can select "Remove other Program Change Events" before accepting the dialog. All other Program Change Events of the channel will be removed.
Tweaking Event Properties
You can finely tweak the properties of selected events using the keyboard. First choose which property to tweak:
- Time, preserving duration = 1
- Start time = 2
- End time = 3
- Note = 4
- Note velocity, controller value, or tempo = 5
Then choose how you'd like that property of the respective selected events to be modified:
- Small decrease = 9
- Small increase = 0
- Medium decrease = Alt + 9
- Medium increase = Alt + 0
- Large decrease = Alt + Shift + 9
- Large increase = Alt + Shift + 0
▶️ Playback
Playback
MidiEditor allows you to play the song when you have selected an output device.
You can find buttons for the playback in the playback menu or in the toolbar. There are buttons which allow you to start a playback (or a recording, please read Recording Midi data for more details), to stop and pause the playback, and to control the cursor. Moreover, individual tracks and channels can be muted and the metronome can be controlled from within the playback menu.
Muting Tracks and Channels
Sometimes it makes sense to play only specific channels or tracks in order to listen to one or more instruments at a time. Hence, specific tracks and channels can be muted. If either the track or the channels assigned to a Midi event is muted, the event will be ignored during the playback. Hence, notes of muted tracks and channels will not be audible during the playback.
In order to mute a specific track or a channel, please press in the according list in the track editor or the channel editor. Click again in order to make the channel or track audible again.
Moreover, there are actions which allow you to mute or make audible all tracks or channels at once. These buttons can be found in the playback menu as well as in the track editor or the channel editor.
If you want to play one channel alone, the channel can be marked to be the "solo channel". This will automatically mute all other channels without having to mute them manually. The solo mode can be entered by clicking for the according channel in the channel editor.
Setting the Cursor
You can specify the position in the song where the playback starts when pressing the play button. This can be done by double clicking into the time line above the event view.
In the playback menu there are additional actions which can move the cursor to the next or previous measure ( and
and  ), the next or previous marker (
 and
and  ), or reset the cursor to start the playback at the beginning of the file (
 ).
).
Speed
Sometimes it will be useful to slow done the playback speed (or to speed it up). This can be done by setting the playback speed in the playback menu. Setting the playback speed to 1 (default) will play at normal speed, while setting it to 2 will result in a two times faster playback speed. Playback speeds lower than 1 will slow down the playback.
Metronome
![]()
The metronome can be enabled or disabled in the playback menu or in the toolbar. Enabling the metronome will result in a metronome sound at each beat during the playback.
Locking the Screen
When you play a song and there must not be any delays while playing you may have to lock the screen by enabling  in the playback menu. This mean that the event view does not follow the cursor while playing, because the repainting of the window can cause a short delay on slower machines.
🎤 Recording MIDI Data
Recording Midi Data
MidiEditor is able to record Midi data from an input device, e.g. a digital piano.
To start a recording, press the record button in the playback menu or in the toolbar. MidiEditor will start a playback (which will allow you to hear any in advance entered Midi events) and listen to the input device at the same time. Hence, played notes (and other events) which where entered using the input device can be added to the currently loaded Midi file which will add the events at the time they were played.
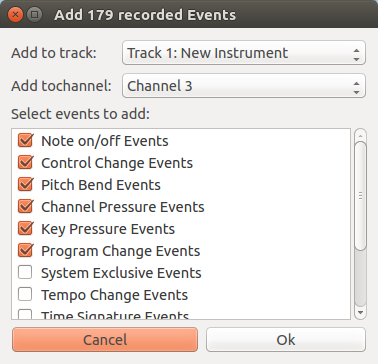
After a recording has been finished, click the stop button in the playback menu or in the toolbar. If any events have been recorded, a dialog will pop up which allows you to specify how to handle the recorded events.
You can ignore some event types. All events with this type will not be added to the file, all other events will be added at the time they have been played. You can specify the track and the channel of the recorded events in the dialog. Pressing "Ok" will add the events to the file.
After the events have been added, you may want to edit the events. This can include correcting wrong notes or adjusting the timing. Especially the quantization function will be useful in this context,
📁 File Menu
File Menu
 | New Creates a new, empty Midi file. |
 | Open... Open an existing Midi file. |
| Open recent... Open an existing Midi file from a list of recently opened files. | |
 | Save Save the current Midi file. |
 | Save as... Save the current Midi file at a given path. |
| Quit Close MidiEditor. |
✂️ Edit Menu
Edit Menu
 | Undo Undo the last action. |
 | Redo Redo the last action which has been undone. |
| Select all Select all events which are currently visible. | |
| Select all events from channel... Select all events which are assigned to a given channel. | |
| Select all events from track... Select all events which are assigned to a given track. | |
 | Copy events Copy all selected events to the clipboard. |
 | Paste events Paste the copied events from the clipboard. The first event will start at the cursor position. Using the paste options (see below) the user can specify which track and channel the new events will be assigned to. |
| Paste options... Lets the user specify, which channel and which track pasted events will be assigned to. Fixed tracks and channels can be chosen, or the channel and track from the copied events can be chosen. Also, the channel and track which have been chosen for new events can be selected. | |
 | Settings... Opens the settings dialog (see Setting up MidiEditor) |
👁️ View Menu
View Menu
| Zoom... This menu contains items which allow you to zoom in or out (horizontal and vertical) and to restore the default zoom settings. | |
 | Show all channels Sets all channels to visible. |
 | Hide all channels Hides all channels. Events from hidden channels will not be shown in the event view. |
| Show all tracks Sets all tracks to be visible. |
| Hide all tracks Hides all tracks. Events from hidden tracks will not be shown in the event view. |
| Colors... Provides two items which let the user select whether the events' colors shown in the event view are obtained from the events' channels or from their tracks. | |
| Raster The raster shown in the event view (click here for details) can be customized with this menu. The raster can be turned off or set to the known note lengths (i.e. quarters, 8ths, etc.). |
🎹 MIDI Menu
Midi Menu
| Settings... Opens the settings dialog (see Setting up MidiEditor) |
 | Connect Midi In/Out If the connected input device does not make the notes audible which are played on this device (e.g. during recording), it can be made audible by connecting it to the specified output device. Click here for details. |
| Midi panic Sends a Midi panic signal to the output device. This device is expected to be silent after this signal. |
🎵 Playback Menu
Playback Menu
 | Play Plays the song from the selected cursor position. Click here for details. In order to make your songs audible, make sure that an output device is specified. |
 | Pause Pauses the playback. |
 | Record Records data from the input device. Click here for details. |
 | Stop Stops the current playback or the current recording. |
| Back to begin Moves the cursor to the beginning of the song. |
| Previous measure Moves the cursor back to the beginning of the previous measure. |
| Next measure Moves the cursor forward to the beginning of next measure. |
| Previous marker Moves the cursor back to the time of the previous marker text event. Although they have no bearing on how a song will sound when it is played back, markers are a useful way to denote sections of the song and to jump between them while editing. |
| Next marker Moves the cursor forward to the time of the next marker text event. |
| Playback speed... Provides a menu which allows the user to select a playback speed. This will speed up or slow down the playback. Click here for details. | |
 | All channels audible Makes all channels audible during playback. Click here for details. |
 | Mute all channels Mutes all channels during playback. Notes from channels which are not audible will not be played during playback. Click here for details. |
| All tracks audible Makes all tracks audible during playback. Click here for details. |
| Mute all tracks Mutes all tracks during playback. Notes from tracks which are not audible will not be played during playback. Click here for details. |
 | Lock screen while playing If checked, the window will not be updated during playback. This is useful if the update should causes delays. Click here for details. |
 | Metronome Enables or disables the metronome. Click here for details. |
🛠️ Tools Menu
Tools Menu
| Current tool... This menu contains a list of all available tools which can be selected for editing the file's content inside the event view (see below for details of the individual tools). | |
| Standard tool The standard tool combines all tools and is able to perform most actions needed to edit Midi data. |
| Select single Events This tool can be used to select or deselect single events. |
| Select Events (Box) This tool can be used to draw a box around events to select or deselect them. |
| Select all Events on the left side Select all events occuring before a given time. |
| Select all Events on the left side Select all events occuring after a given time. |
| Move Events (all directions) Move all selected events in both directions. |
| Move Events (Left and Right) Move all selected events left and right. |
| Move Events (Up and Down) Move all selected events up and down. |
| Change the duration of the selected event Change the duration of all selected notes. |
| Create new Events Add new events to the file. |
 | Eraser (remove events) Remove events from the file. |
| Remove selected events Remove all currently selected events. |
 | Align left Makes all selected events start at the same time. This time is equal to the start time of the leftmost selected event. |
 | Align right Makes all selected events end at the same time. This time is equal to the end time of the rightmost selected event. |
 | Equalize Makes all selected events have the same duration as well as the same start and end times. The new duration is equal to the average duration of the selected events. |
| Quantize selection Quantifies all selected events. After quantization, the events will have exact notelengths (quarters, 8ths etc.). Also their timing inside the measure will be exact. The smallest fraction (i.e. the smallest duration of the notes) can be specified using the menu "Quantization fractions" (see below). Click here for details |
| Quantization fractions Set the smallest note duration for the quantization. Click here for details | |
| Quantize tuplet... As tuplets cannot be quantified with the above explained tools, select the notes which belong to the tuplet and click "Quantize tuplet...". A dialog will popup which lets you enter details for the tuplet quantization. Click here for details | |
| Repeat tuplet quantization Select the notes belonging to a tuplet. Click this menu item in order to quantize the tuplet with the last entered properties (using the menu item above). Click here for details | |
| Add track Adds a new, empty track to the Midi file. Click here for details | |
| Remove events from channel... Removes all events which are currently assigned to a specified channel.Click here for details | |
| Move events to channel... Assigns all selected events to the specified channel. Click here for details | |
| Move events to track... Assigns all selected events to the specified track. Click here for details | |
| Transpose selection... Transposes selected events up or down, based on semitone numbers entered by the user in the opening dialog. | |
| Set file duration Set the song's duration in milliseconds. If the entered duration is smaller then the current duration, everything beyond the new end of the file will be removed. | |
| Scale events Scales the timing of all selected events. | |
| Magnet Enables or disables the magnet. The magnet can be used to align moved, scaled, or newly created events to the specified raster. Click here for details |
| Edit Tempo Allows changing the tempo within a song. Click here for details |
| Edit time signatures Allows changing the meter within a song. Click here for details |
| Add or remove measures Allows to add or remove measures. Click here for details |